


A Practical Guide to Remote Camera Monitoring
- Бонус за регистрацию онлайн казино
- Jul 7, 2025
- 13 min read
Remote camera monitoring is all about having eyes on your property from anywhere in the world. It’s the power to view, manage, and record live video from your security cameras over the internet, using just about any device you own. This simple concept transforms a basic surveillance setup into a proactive security system that gives you genuine peace of mind.
What Remote Camera Monitoring Really Means Today
Forget those clunky, old-school closed-circuit television (CCTV) systems you used to see, where someone was stuck in a security room staring at grainy monitors. Today’s remote camera monitoring is a connected ecosystem. It pulls together high-definition IP cameras, solid network connections, and smart software to put real-time security insights right in your pocket.
But it’s not just about pulling up a live feed. Modern systems offer a whole suite of powerful tools that deliver both security and operational value. When you look at the bigger picture, including dedicated security alarm monitoring solutions, you start to see how video surveillance has grown into a comprehensive safety net for your property.
The Core Components of a Modern System
At its core, any remote monitoring setup has three essential parts that must work together seamlessly. If one piece falters, the whole system can be at risk.
Hardware: This is more than just the cameras, though they've come a long way. IP (Internet Protocol) cameras are the current standard, designed to connect directly to a network.
Network: Think of the network as the digital highway that carries the video data from your cameras to your screen. This includes everything from your local Wi-Fi or wired connections to your internet service provider.
Software: This is your command center. It could be an app on your phone, a program on your desktop, or a web portal where you can view live feeds, manage recordings, and tweak all your settings.
This diagram shows how a basic IP camera gets on the network, which is the foundational concept for any remote monitoring system.

As you can see, the camera itself is a network device. It can send and receive data directly over the internet. This is a massive departure from older analog cameras that needed a direct, physical wire running all the way back to a recorder.
The global demand for this technology is exploding. The video surveillance market is projected to hit nearly USD 58 billion in 2025 and is expected to soar to USD 88.7 billion by 2030.
Choosing the Right Camera for Your Environment
Picking the right camera is the single most important decision you'll make when setting up a remote monitoring system. It's easy to get lost in brand names, but what truly matters are the technical specs and how they fit your specific location. This is where you lay the foundation for a system that actually works.
Let's start with the basics. You'll see terms like 4K resolution thrown around a lot. It offers incredible detail—perfect for zooming in on a license plate or a face after an incident has occurred. But there's a trade-off. That high-quality video eats up storage space and demands more network bandwidth than standard 1080p HD. You have to decide if that level of detail is worth the extra resources.
Matching Specs to Your Location
Your environment dictates the hardware, period. A camera meant for a quiet indoor office won't survive a week monitoring an outdoor loading dock.
For any outdoor camera, weatherproofing is non-negotiable. I won't even consider a camera unless it has at least an IP66 rating. This certifies it can stand up to dust, rain, and even high-pressure water jets. Without it, you're just gambling against the elements.
Another critical factor is the field of view (FoV). Think about what you need to see. A wide FoV, say 130 degrees or more, is fantastic for covering a broad area like a parking lot with a single device. This can save you money. On the other hand, for a critical choke point like a gate or doorway, a narrower FoV provides a much more detailed and focused view where it counts most.
Understanding Camera Types and Their Strengths
The camera market is exploding, with new tech hitting the shelves all the time. The global IP camera market is projected to jump from USD 15.3 billion in 2025 to over USD 36.3 billion by 2035. This boom is fueled by the demand for smarter, more capable remote monitoring solutions. You can dig deeper into these trends with this IP camera market analysis.
This image really captures the core of a modern remote monitoring setup—accessing multiple live feeds from anywhere.
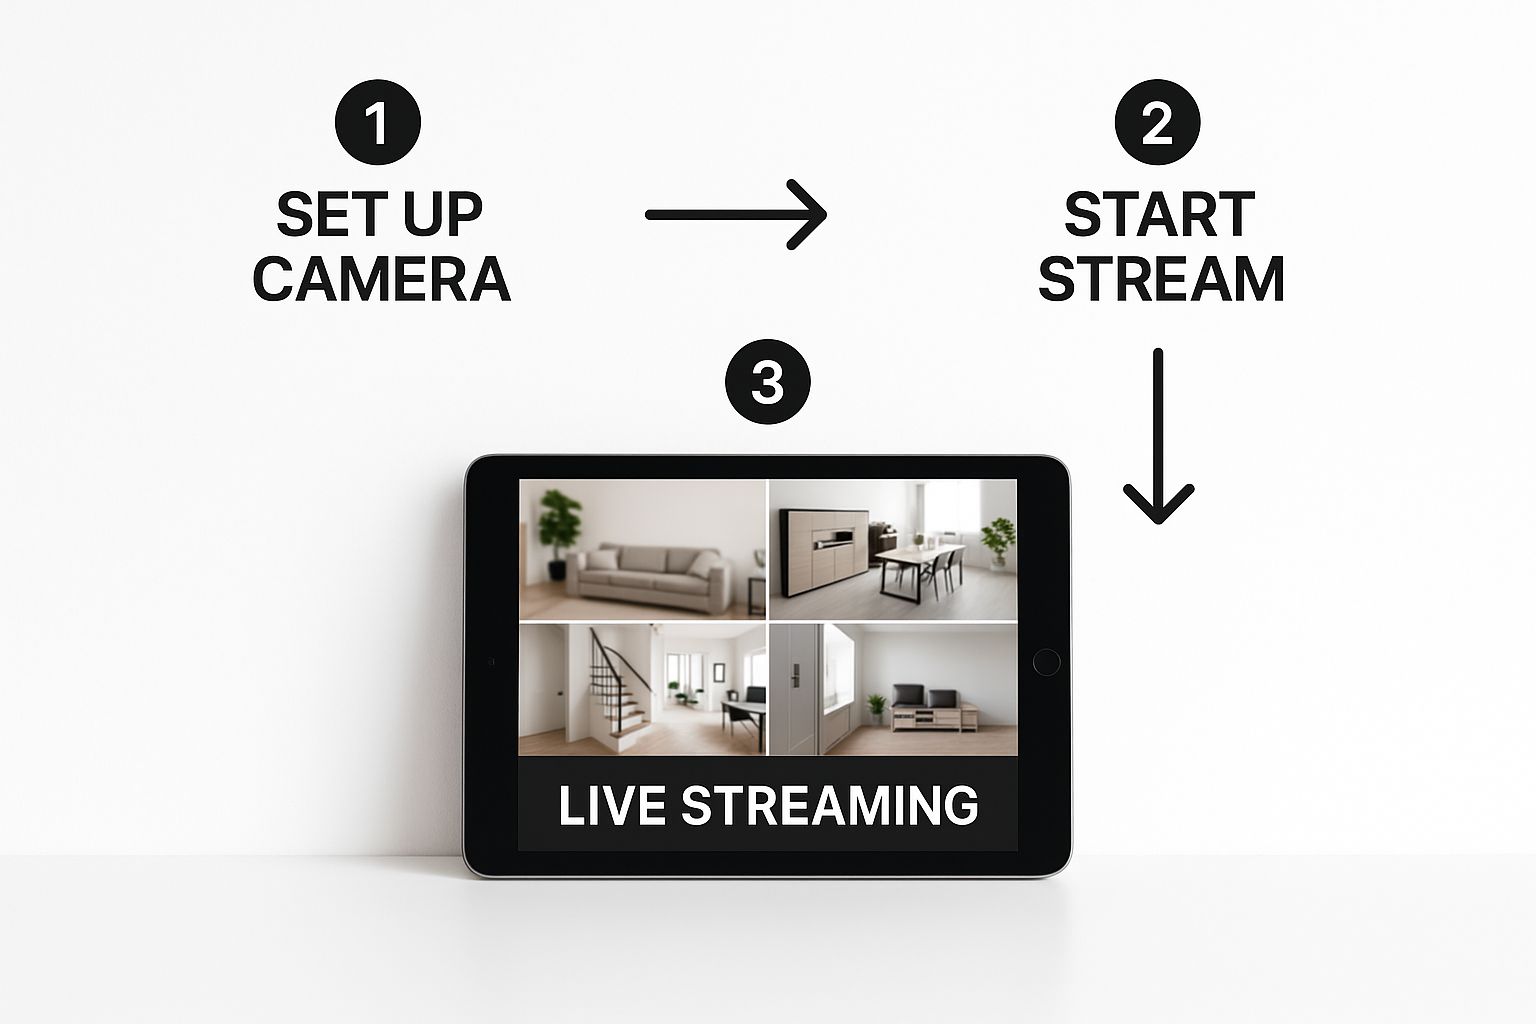
It's this ability to pull up what's happening in real-time on a single screen that makes today's IP systems so powerful.
To help you decide, let's break down the most common camera types you'll encounter. Each has its own strengths and is best suited for different jobs.
Camera Type Feature Comparison
Camera Type | Best For | Connectivity | Key Advantage |
|---|---|---|---|
Fixed IP | Defined areas (entrances, hallways, cash registers) | Ethernet (PoE) or Wi-Fi | Reliable, set-and-forget monitoring for specific zones |
PTZ | Large, open properties (parking lots, warehouses) | Ethernet (PoE) | Active, operator-controlled surveillance of wide areas |
Infrared (IR) | 24/7 security in low-light or no-light conditions | Ethernet (PoE) or Wi-Fi | Sees in complete darkness, providing round-the-clock coverage |
These are the workhorses of the industry, but knowing when to use each one makes all the difference in building an effective system.
My Experience: For a large, open space like a storage yard or event venue, a single PTZ camera can often do the job of three or four fixed cameras. While the upfront cost is higher, the investment can lead to lower overall system complexity and better coverage.
Ultimately, the best camera is the one that reliably captures the evidence you need, when you need it. By aligning the camera’s capabilities—from resolution and weatherproofing to night vision and field of view—with the unique challenges of your environment, you build a foundation for a truly powerful remote camera monitoring system.
Building a Network That Won't Let You Down
You can have the most expensive 4K camera on the market, but if its video stream can’t get from your property to your phone, it’s just a high-tech paperweight. I’ve seen countless DIY security projects fail at this exact point. Your network is the unsung hero of any good remote monitoring setup; it’s the foundation that makes everything else work.
When you're shopping for an internet plan, providers love to boast about download speeds. For our purposes, that's mostly marketing fluff. The number you really need to care about is the upload speed. This is what determines how much video data your system can push out to you in real-time.
A single 1080p camera needs a steady 2-3 Mbps of upload bandwidth to function well. If you’re stepping up to 4K, that demand can easily jump to 5-8 Mbps or even higher. Planning on multiple cameras? You have to do the math and add up the requirements for each one to find the total upload speed your internet connection must support.
Getting the Strongest Wireless Signal
If you're using Wi-Fi cameras, where you place them is a two-part puzzle. It's not just about getting the perfect angle of the driveway; you also have to think about its connection back to your router. Things like thick brick walls, concrete, metal siding, and even large appliances can absolutely kill a Wi-Fi signal.
Place Your Router Centrally: Don't tuck your router away in a corner of the basement. Try to position it in a central location on your main floor to give it the best chance of reaching everywhere.
Invest in a Mesh System: For bigger homes or sprawling properties, a mesh Wi-Fi system is a game-changer. It uses multiple nodes to blanket your entire space with a strong, seamless signal, killing those frustrating dead zones.
Go Wired When It Counts: For your most important cameras, nothing beats the rock-solid reliability of an Ethernet cable. If you can, use Power over Ethernet (PoE), which is fantastic because it sends both power and data through a single cable, simplifying your installation.
What if you're monitoring a place completely off the grid, like a construction site or a rural cabin? In these cases, you’ll need to look into specialized off-grid internet options for remote connectivity, such as dedicated cellular routers or satellite internet services.
A Quick Guide to Router Settings
To pull up your camera feeds from anywhere in the world, you might need to tweak a few settings in your router's admin panel. The most common task here is setting up port forwarding. This basically works like a digital receptionist for your network. It tells your router that any request coming from the internet on a specific port should be sent directly to your camera system or NVR.
Think of it this way: Your public IP address is like the street address of a large apartment building. The port number is the specific apartment number. Without it, the delivery (your video feed) gets lost in the lobby.
Thankfully, many modern camera systems have made this much easier with cloud or P2P access, which often negotiates this connection for you automatically. Still, knowing what port forwarding is can be incredibly helpful if you ever need to troubleshoot why you can't connect. A solid network is a secure network.
Where Will Your Video Footage Live? Local vs. Cloud Storage
Once your cameras are up and running, you have a critical decision to make: where will all that video footage be stored? This choice directly impacts how you get to your recordings, how safe they are from damage or theft, and what your long-term costs look like. For any remote camera monitoring system, it really boils down to two main paths: local storage using a Network Video Recorder (NVR) or a cloud-based subscription service.
Let’s start with the traditional route. An NVR is a physical device, essentially a specialized computer with hard drives, that you keep at your location. It connects to your cameras over your local network and records everything directly to its internal drives, often 24/7. The biggest win here is total control. You own the hardware, you're not locked into monthly fees, and your video footage never has to travel across the public internet unless you specifically access it remotely. For a business that can't afford to miss a second of footage, even if the internet goes down, an NVR is a rock-solid choice.
The alternative is cloud storage. Instead of recording to a box in your closet, your cameras send their footage directly over the internet to a secure, professionally managed data center. The most obvious benefit? Your recordings are safe and sound, far away from your physical property. If there's a fire, a flood, or a break-in where the thief takes the NVR, your evidence is still accessible from any internet-connected device. Before you jump in, it's smart to weigh the advantages and disadvantages of cloud backup solutions to make sure this model fits your needs.
The Growing Appeal of Cloud-Based Monitoring
There's no denying the industry is leaning heavily into the cloud. The cloud camera market, a key piece of the remote monitoring puzzle, is expanding at an impressive clip. It's projected to hit $17.6 million in 2025 and is forecast to surge to $44.9 million by 2032. You can get a deeper look into the cloud camera market's growth and see why so many are making the switch.
This isn't just about storage; it's about the powerful software features that come with these services. Modern cloud platforms are packed with intelligent security tools that go far beyond simple recording.
AI-Powered Detection: This is a game-changer. Instead of getting an alert every time a car drives by, the system can distinguish between people, vehicles, and animals. This drastically cuts down on the noise from false alarms caused by things like falling leaves or moving shadows.
Custom Activity Zones: You can literally draw boxes on your screen to define specific areas of interest. This means you can get notified only when there's movement at your front door or near a cash register, while ignoring all the harmless activity in the background.
A Pro Tip From Experience: You don't always have to choose just one. For ultimate peace of mind, I often recommend a hybrid setup. Use a local NVR for continuous, gap-free recording, and then add a cloud service to back up crucial motion-triggered events. This gives you the unmatched reliability of local storage combined with the off-site protection of the cloud.
Video Storage Options Analysis
Choosing between an NVR and the cloud isn't always a simple decision. Your budget, security priorities, and even your comfort level with technology will all steer you in one direction or the other.
To make things clearer, let's break down the core differences in a side-by-side comparison.
Storage Method | Pros | Cons | Best For |
|---|---|---|---|
Local (NVR) | No monthly fees. You own the footage. Works without an internet connection. | Higher upfront cost for the NVR. Vulnerable to on-site theft or damage. Remote access requires setup. | Businesses needing continuous 24/7 recording and those with unreliable internet. |
Cloud | Footage is safe off-site. Accessible from anywhere. Lower initial cost. | Requires a stable internet connection. Monthly subscription fees add up. Data privacy depends on the provider. | Homeowners and businesses that prioritize easy remote access and protection against physical theft of recordings. |
Ultimately, the best choice is the one that aligns with your specific security strategy. An NVR offers control and autonomy, while the cloud delivers convenience and off-site redundancy.
Getting the Most Out of Your System in the Real World
Alright, you've got your cameras installed and can see the feed on your phone. That's a huge milestone, but the job isn't quite done. Now comes the part where we turn this basic setup into a security tool that actually works for you, not against you. Without a little fine-tuning, you'll end up with a system that creates more noise than peace of mind.
The biggest complaint I hear from people who've just set up their own cameras? "Alert fatigue." Their phone blows up for every swaying tree branch, passing car, or neighborhood cat. It’s tempting to just turn off all notifications, but that defeats the purpose. The culprit is almost always motion detection that's way too sensitive.
Before you do anything else, jump into your camera's software and find the sensitivity settings. Most systems use a simple slider, often from 1 to 100. As a starting point, dial it back by 20-30%. Let it run for a day and see what happens. The goal is to find that perfect balance where it still catches a person walking up your driveway but ignores the rustling leaves. This one adjustment can make a world of difference.
Fine-Tuning Your System Settings
Modern security software gives you some incredibly powerful tools to filter out the noise. Don't let them go to waste.
Activity Zones: This feature is a game-changer. You can literally draw boxes over the parts of the camera's view you care about—like your porch or a specific window. This tells the system to completely ignore motion happening anywhere else, like on the busy sidewalk out front.
Object Detection: If your system has any kind of "smart" or AI detection, this is your best friend. Tell it you only want to be alerted for "persons" or "vehicles." This is the single fastest way to stop getting notifications for squirrels, birds, and weather changes.
Tripwire Lines: Some higher-end software lets you draw a virtual line in the video feed. You'll only get an alert when something crosses that line. It's perfect for monitoring a gate or fence line without being bothered by activity on either side.
The most effective security camera systems aren't just pointed in the right direction; they're taught what to look for. You have to tell the software what's important and, just as crucially, what to ignore.
A Simple Maintenance Checklist
Like any other piece of tech, your cameras and recorder need a little TLC to perform their best. A few minutes of upkeep a few times a year can prevent some major headaches down the road.
This isn't some time-consuming chore. Think of it as a quick check-in to protect your investment and ensure it's ready when you need it.
Task | Frequency | Why It Is Important |
|---|---|---|
Clean Camera Lenses | Quarterly | Dust, spiderwebs, and grime can blur the image and, even worse, trigger false motion alerts. A quick wipe with a microfiber cloth is all it takes. |
Check Cable Integrity | Annually | Take a quick look at any exposed cables. You're looking for damage from sun exposure, chewing from pests, or general wear and tear that could cause a failure. |
Apply Firmware Updates | As Released | This is non-negotiable for security. Updates patch vulnerabilities that hackers could use to access your system. If there's an auto-update option, turn it on. |
Test Remote Access | Monthly | Don't wait for an emergency to discover you can't log in. Just open your app once a month to make sure your remote connection is solid. |
One last thought: be mindful of where you point your cameras. Your goal is to monitor your property, not your neighbor's. A well-placed camera focuses on your vulnerable entry points—your doors, windows, and gates—while respecting your neighbors' privacy. This isn't just about being a good neighbor; it keeps your monitoring focused on what truly matters.
Common Questions on Remote Camera Monitoring
As you dive into the world of remote camera monitoring, you're bound to have questions. It's completely normal. Getting a handle on a few key concepts from the start will make the whole process smoother and help you build a system you can actually rely on.
Let's break down some of the most common questions I hear from folks setting up their first system.
How Much Internet Speed Do I Really Need?
This is easily the number one question, and the answer isn't what most people expect. Everyone focuses on download speed, but for streaming video from your property, it's all about upload speed. This is the single biggest factor that determines how much video you can push out to your phone or monitoring station.
Think of it as a pipeline. Your upload speed is the size of that pipe.
A good, practical rule of thumb is to have at least 2-3 Mbps of dedicated upload speed for each 1080p camera you want to view live at the same time. If you're stepping up to 4K, that number jumps dramatically—plan on needing 5-8 Mbps per camera, sometimes more, for a crisp, uninterrupted feed.
Pro Tip: Before you even think about buying hardware, run an internet speed test. Pay close attention to the "upload" number. That single figure will tell you what your current internet plan is truly capable of and prevent a lot of frustration down the road.
Can My Remote Camera System Be Hacked?
Let's be direct: yes, any device connected to the internet can be a target. But here's the reality—the overwhelming majority of camera hacks aren't the work of sophisticated cybercriminals. They happen because of simple, preventable mistakes. The good news is that locking down your system is surprisingly straightforward.
Your first and most critical line of defense is getting rid of the default password that came in the box. Leaving it is like leaving your front door wide open.
Here’s what you absolutely must do to protect your system:
Create Strong, Unique Passwords: Use a long, complex password with a mix of letters, numbers, and symbols for your cameras and your recorder. Don't reuse passwords from other accounts.
Enable Two-Factor Authentication (2FA): If your system supports it, turn this on immediately. It adds a second layer of security, usually a code sent to your phone, making it nearly impossible for someone to log in with just a stolen password.
Keep Your Firmware Updated: Manufacturers regularly release updates to patch security holes. Set your system to update automatically if you can. If not, make it a habit to check for new firmware every few months.
What Is the Real Difference Between a DVR and an NVR?
This one trips a lot of people up. Both devices record video, but they handle completely different camera technologies, and the distinction is crucial.
A DVR, or Digital Video Recorder, is designed for older analog cameras. It takes a raw analog signal from the camera (over a coaxial cable) and then does the work of converting it into a digital file for storage.
An NVR, or Network Video Recorder, works with modern IP (Internet Protocol) cameras. These cameras are like mini-computers themselves—they capture, compress, and process the video right on the device. The NVR simply receives this ready-made digital stream over a network cable.
For any new installation today, an NVR is the clear choice. It's the modern standard, offering much higher video resolution, easier installation with Power over Ethernet (PoE), and far more advanced features than any DVR system.
Ready to build a reliable security system for your business or property? The experts at PCI Audio-Video Security Solutions can help you design and install a system with advanced cameras, access control, and robust remote monitoring capabilities. Learn more about professional security installations.
Comments