


Mastering Home Surveillance Camera Placement
- Бонус за регистрацию онлайн казино
- Jul 17, 2025
- 16 min read
Before you buy a single camera or drill a single hole, the most important thing you can do is walk your property and think like a burglar. The best security camera setup isn't about having the fanciest tech; it's about smart, strategic placement.
This process starts with a simple but crucial step: conducting your own security audit.
Crafting Your Home Security Blueprint
Take a walk around your home's perimeter—do it once during the day and again at night. The goal is to see your property from a different perspective. Where are the blind spots? Are there ground-floor windows conveniently hidden by overgrown bushes? Is that side gate an open invitation to your backyard?
Answering these questions helps you pinpoint your home's unique vulnerabilities. It's this personalized audit that forms the foundation of a truly effective surveillance plan.
Define Your Security Objectives
Once you know your weak spots, you need to decide what you want your cameras to accomplish. Simply having cameras isn't enough; they need a clear purpose. Are you trying to:
Deter: Make your front porch an unattractive target for package pirates.
Identify: Capture clear facial images or license plates that could be used as evidence.
Monitor: Keep a casual eye on kids playing in the yard or check on pets while you're at work.
Verify: Confirm what’s happening if an alarm goes off, separating a false alarm from a real threat.
A camera aimed at general deterrence in the backyard has very different placement needs than one tasked with identifying everyone who walks up your front path. Defining these goals upfront is key.
A well-planned security system is a powerful deterrent. The goal isn't just to record a crime but to prevent it from happening in the first place by making your home an unappealing target.
This proactive mindset is catching on. The smart home security market in the United States was valued at USD 9.98 billion in 2024 and is expected to climb to USD 30.10 billion by 2030. With reports showing that 72% of U.S. households now own at least one smart security device, it's clear that homeowners are getting serious about protecting their property.
To help you get started, use this checklist to walk through your property and systematically identify your security needs.
Your Home Security Audit Checklist
Use this checklist to systematically identify and prioritize your home's most vulnerable areas during your initial security assessment.
Area of Concern | Primary Security Goal | Potential View Obstructions | Priority Level (High/Medium/Low) |
|---|---|---|---|
Front Door/Porch | Identify faces, monitor packages | Large pillars, porch swing, seasonal decor | High |
Back/Patio Door | Deter entry, monitor access | Low-hanging eaves, trees, patio furniture | High |
Driveway/Garage | Capture license plates, deter car break-ins | Neighbor's fence, streetlights, parked cars | High |
Ground-Floor Windows | Deter break-ins | Landscaping, bushes, poor lighting | Medium |
Side Gate/Yard | Monitor access to the backyard | Fences, sheds, shadows from the house | Medium |
Basement Egress | Detect unusual entry | Window well covers, overgrown plants | Low |
Filling this out will give you a concrete, prioritized list to work from, turning abstract security worries into actionable steps.
Map Your Camera Coverage
With your goals and vulnerable spots identified, grab a pen and paper and sketch a rough layout of your property. Mark where you think cameras should go, noting the primary job for each one. This simple visual plan is incredibly helpful for spotting potential blind spots and ensuring your cameras work together as a cohesive system.
This is the fundamental process boiled down:
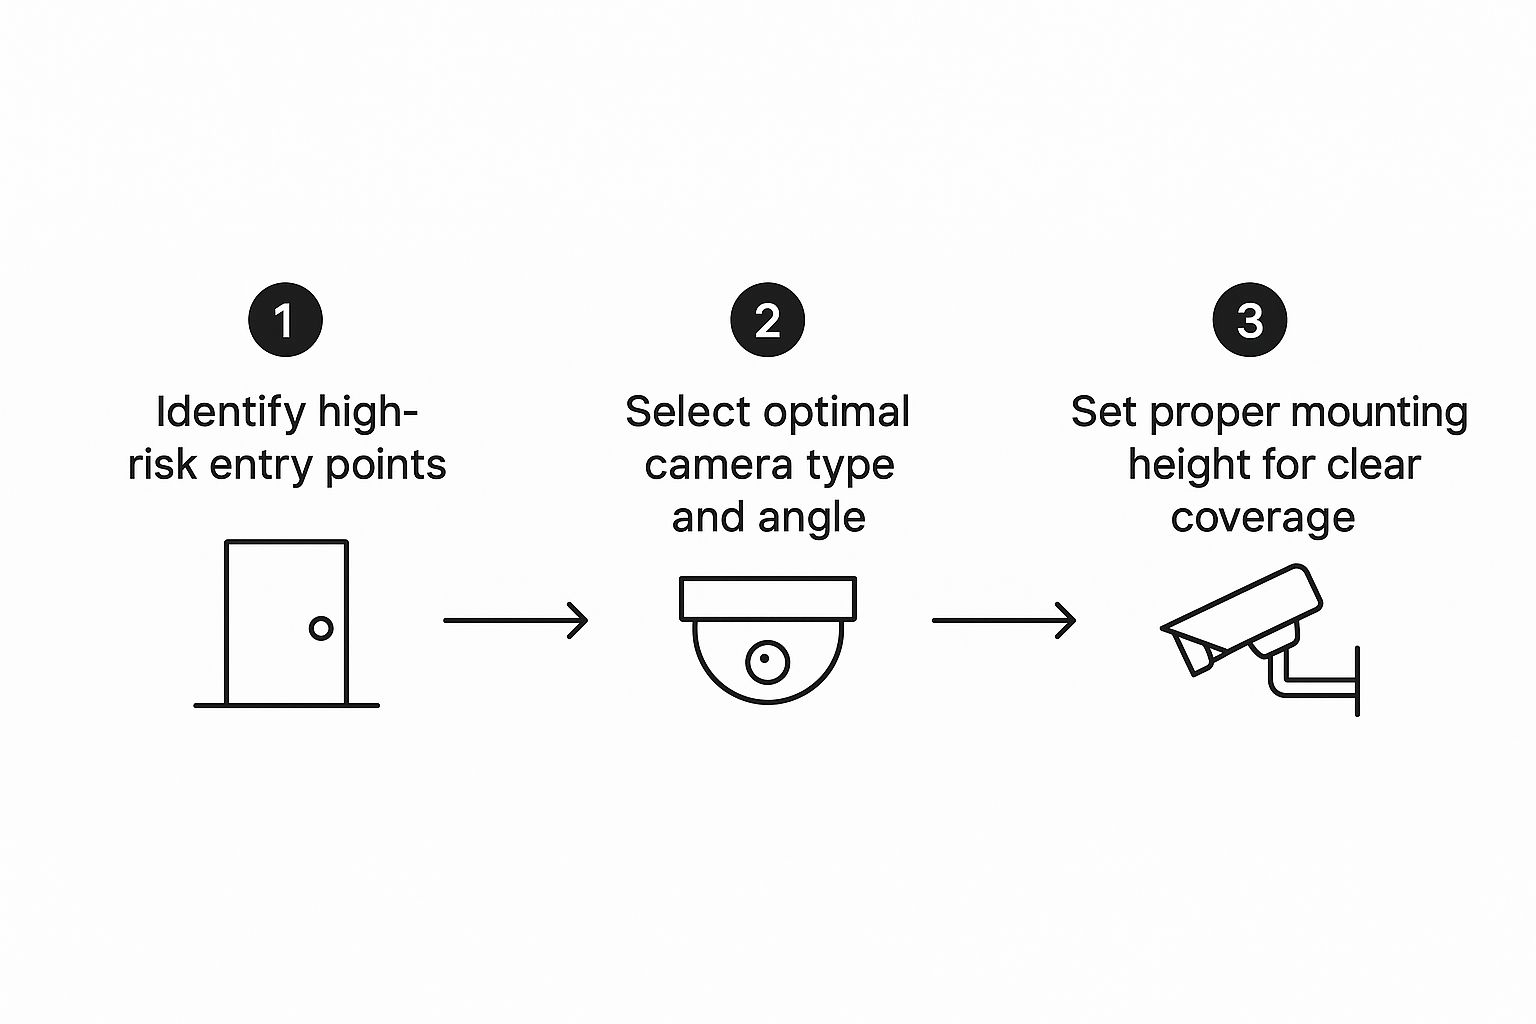
As the visual shows, effective placement is a sequence of deliberate choices. You start by identifying risks, define what you need to see, and then move toward a precise installation that achieves that goal.
Think of a well-designed security system as one of the essential home renovation upgrades that protects your family and can improve your property's value. This blueprint is the foundation for every decision that follows, making sure each camera you install serves a distinct and vital purpose.
Positioning Exterior Cameras for Maximum Deterrence
Your outdoor cameras are your first line of defense, and honestly, they're your most important. Just seeing a camera can be enough to convince a would-be intruder to find an easier target. So, effective home surveillance camera placement isn't just about recording a break-in; it’s about stopping one before it even starts.
To get this right, you have to think like a burglar. Where are the easy entry points? The front door, back patio slider, and those ground-floor windows hidden by bushes are all prime targets. These are the spots you need to prioritize.
Ideal Mounting Height and Angles
I've learned from experience that the sweet spot for mounting outdoor cameras is between 8 and 10 feet off the ground. This height is a perfect compromise. It's high enough to keep the camera out of arm's reach for tampering, but low enough to capture clear, identifying details. If you mount it way up on a second-story eave, you'll get a great view of the top of everyone's head, which is pretty useless.
Once you’ve got the height figured out, the angle is just as critical.
Tilt it Down: Angle the camera down just enough to capture faces, not foreheads. This also helps minimize glare from the sky and keeps the focus where it matters—on the ground.
Watch Out for the Sun: Never point a camera directly into the rising or setting sun. The glare will completely blow out your image, making the footage worthless for hours each day. If you absolutely can't avoid it, make sure you invest in a camera with excellent Wide Dynamic Range (WDR).
Cover the Approach: Aim cameras to see the pathways leading to your doors, not just the doorway itself. This gives you a longer recording of someone approaching and a better chance of getting a clear shot.
My Go-To Tip: Before you start drilling, grab some painter's tape and temporarily stick the camera where you think it should go. Then, pull up the live feed on your phone. Check it in the morning, afternoon, and evening to see how sun glare and shadows affect the view. This little trick has saved me a lot of headaches.
Covering Key Entry and Vulnerable Points
Every house is unique, but the weak spots are almost always the same. Your goal is to create overlapping fields of view that cover all the obvious entry points.
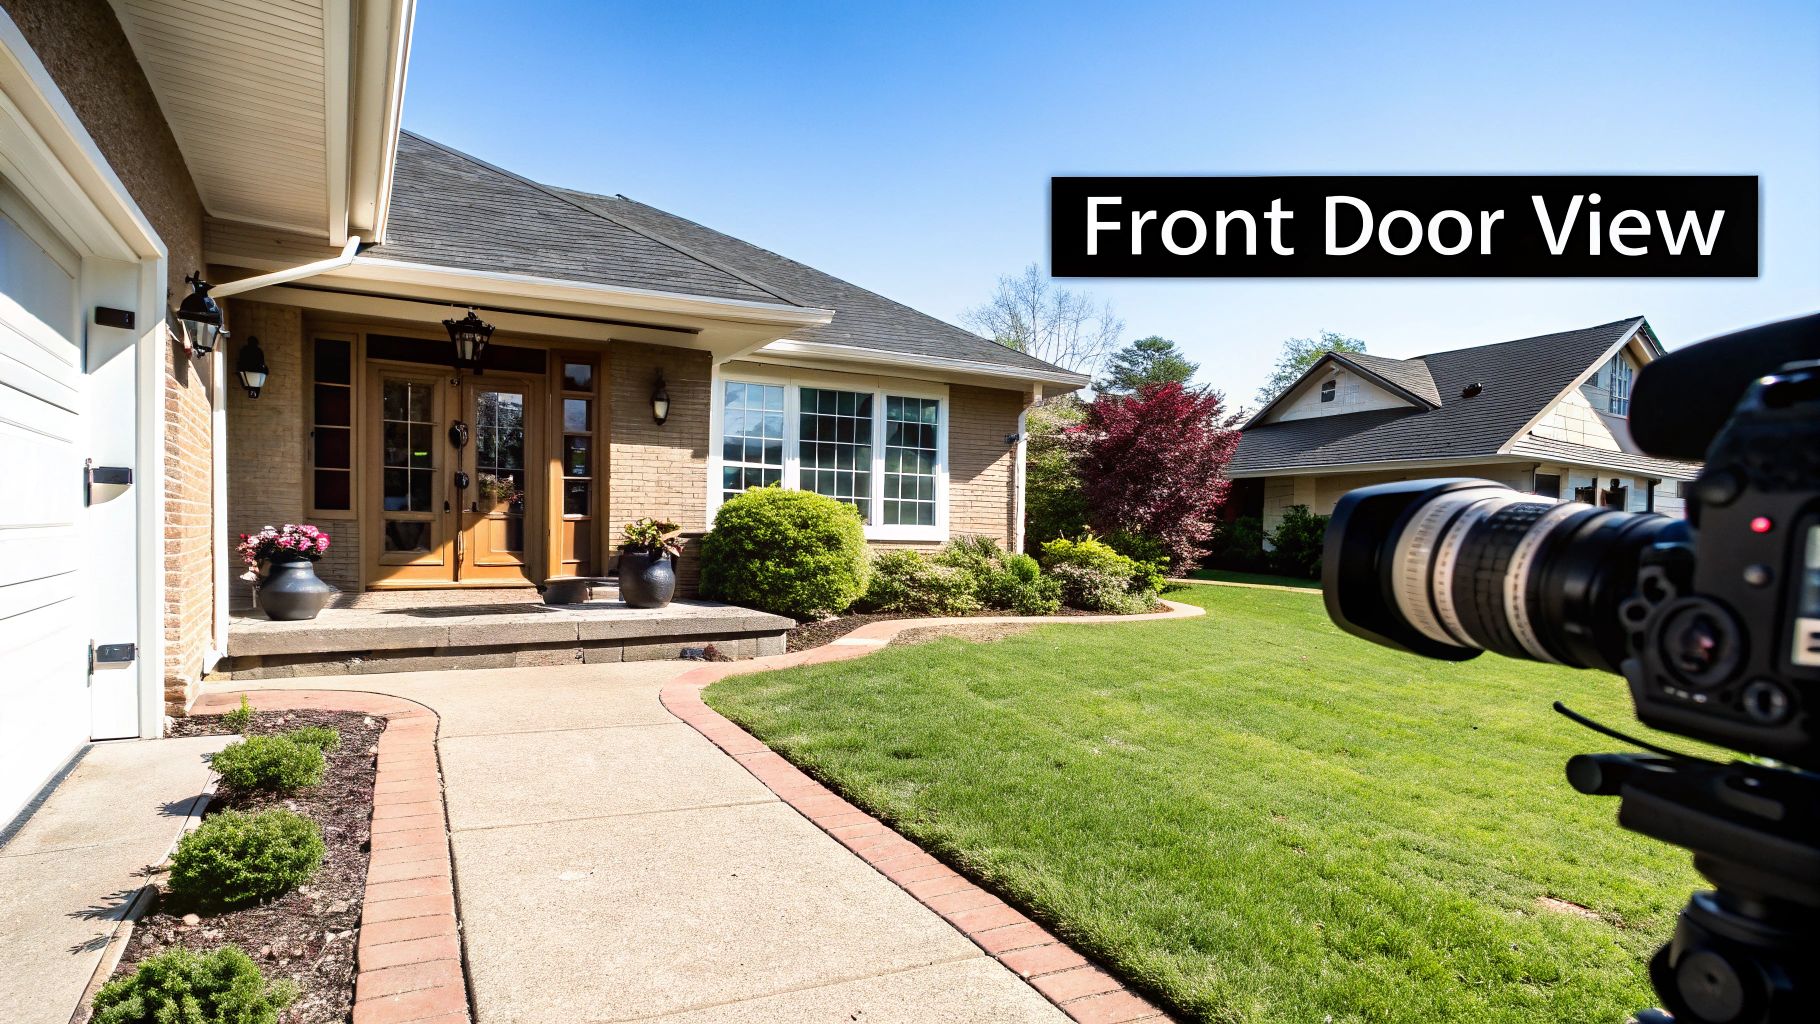
Front Door and Porch This is non-negotiable. A surprising number of burglars try their luck right at the front door. You want a visible camera here that’s aimed to get a crystal-clear look at the face of anyone who rings your bell or tries the handle. It’s also your best defense against porch pirates.
It's no surprise that the global home security camera market is set to explode from USD 23.79 billion in 2025 to USD 48.47 billion by 2030. Doorbell cams are leading that charge, which just goes to show how vital covering your main entrances has become.
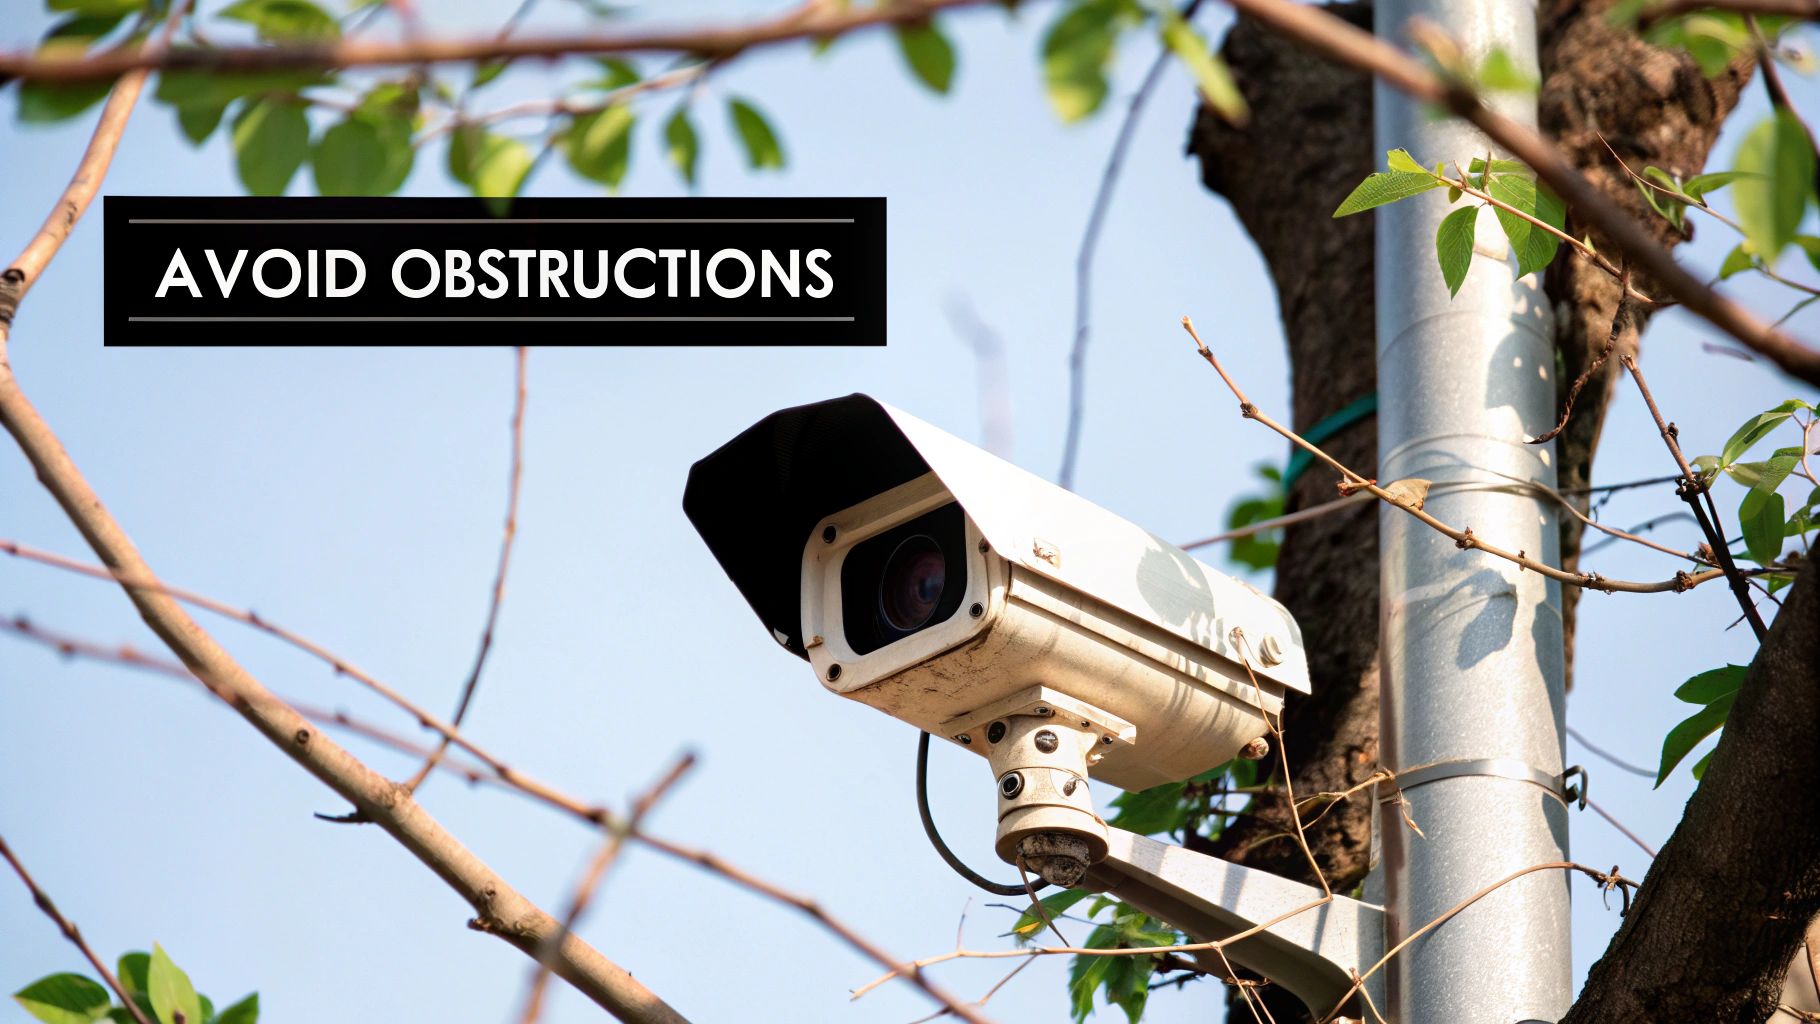
Back and Side Doors These doors are often out of sight from the street, making them a favorite for intruders. Any camera watching these areas needs an unobstructed view, so trim back any overgrown bushes or trees. Since these spots tend to be darker, a camera with solid night vision is a must.
Driveways and Garages Placing a camera high on your garage or home, angled down the driveway, is a fantastic move. It helps you keep an eye on your vehicles, captures license plates, and monitors another major access point to your property.
Vulnerable Ground-Floor Windows Don't overlook the windows, especially those on the back or sides of your home hidden by fencing or landscaping. A single, well-placed camera can often cover a whole cluster of windows, adding a crucial layer of security.
Remember, cameras work best when they can actually see. Pairing your system with effective outdoor home lighting solutions is a game-changer. A well-lit yard eliminates dark hiding spots and makes it incredibly difficult for anyone to approach without being seen.
Placing Interior Cameras for Evidence and Peace of Mind
While your outdoor cameras are the first line of defense, interior cameras play a different, but equally crucial, role. Think of them as your verification system. If someone does get past your exterior security, these are the cameras that will provide undeniable proof of what happened next. The trick to placing them is to capture that vital evidence without making your home feel like a fishbowl.
So, where would an intruder go? They're not going to be admiring the decor in a spare bedroom. They'll move through the main arteries of your home to get to the master bedroom or office. Our job is to cover those high-traffic pathways they can't avoid.
Target High-Traffic Choke Points
Your main goal inside is to cover the areas that are nearly impossible to bypass. We call these "choke points" in the security world.
Main Hallways & Corridors: A single camera at the end of a long hallway can watch the doorways to several rooms at once. It's an incredibly efficient placement.
Staircases: This is a classic. A camera aimed at the top or bottom of the stairs will catch anyone moving between floors. It's a natural bottleneck.
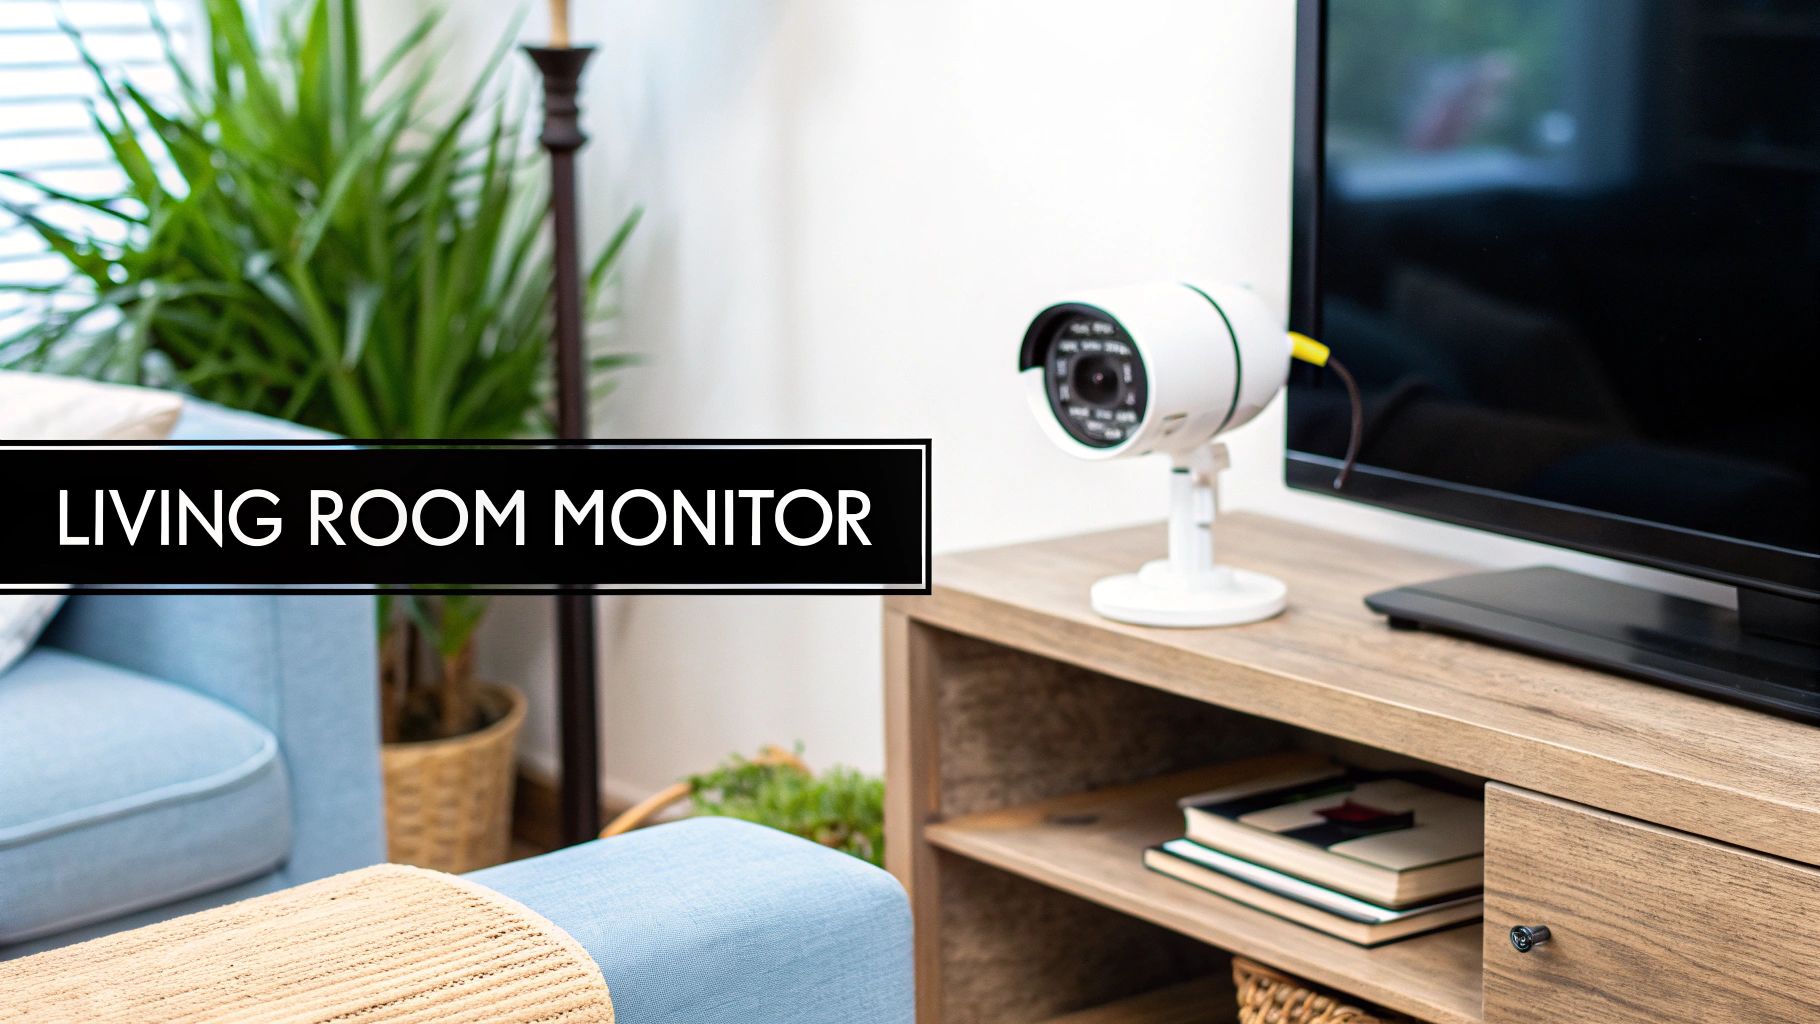
Primary Living Areas: For open-concept homes, placing a camera in the corner of the main living room often lets you see the front door, a patio door, and the hallway entrance all at once.
I once worked with a client who had a large, open living space. We mounted one wide-angle camera discreetly on a high bookshelf. From that single spot, it covered the front door, the stairs to the second floor, and the hallway to the bedrooms. It was the perfect, low-impact solution that provided massive coverage.
An interior camera isn't there to watch you go about your day. Its job is to document the unexpected. If someone breaks in, that footage is the single most important piece of evidence you'll have for the police and your insurance company.
The Critical Importance of Privacy
Putting cameras inside your home understandably raises privacy concerns. A security system should make you feel secure, not spied on. That's why respecting privacy isn't just a courtesy; it's a fundamental part of a smart setup.
There are absolute "no-fly zones" for cameras—anywhere a person has a reasonable expectation of privacy. This is non-negotiable.
Bedrooms
Bathrooms
Anywhere a guest might change clothes
Placing cameras in these spots is more than just creepy; it can land you in serious legal trouble. Thankfully, modern camera manufacturers understand this and have built features to help.
Balancing Security and Comfort
You really can have solid security without sacrificing that feeling of being at home. It all comes down to smart placement and using the tech to your advantage.
Practical Placement Tips for Discretion:
Use Your Furniture: A small camera tucked onto a tall bookshelf or media center can blend right in while getting a great vantage point.
Go for the Corners: Mounting a camera high in a room's corner almost always gives you the widest possible view and keeps it out of your immediate line of sight.
Find Natural Cover: Got any alcoves, ceiling beams, or high plant ledges? These are perfect, out-of-the-way spots that still offer excellent coverage.
Beyond where you put the camera, its built-in features are your best friend. Look for cameras with a privacy mode you can activate in the app, or even better, a physical privacy shutter that blocks the lens completely. Personally, my indoor cameras are on a schedule. They only arm when the system is set to "Away" or for the overnight hours. This simple automation means they’re off when we’re home, giving us complete peace of mind.
Matching Camera Technology to the Right Location
Picking the perfect spot for a camera is only half the battle. Your home surveillance camera placement strategy can be flawless, but it won't mean much if the camera itself isn't up to the task. The camera that works great for your wide-open backyard could be a terrible choice for capturing license plates in the driveway.
You don't need to be a tech guru to get this right. It’s really just about understanding a few key features to make sure you're using the right tool for the job. Let's break down the specs that truly matter for effective placement.
Decoding Field of View and Resolution
First up is the Field of View (FoV), which is just a fancy way of saying how wide of an area the camera can see. A wide-angle lens, maybe with a 130-degree FoV, is fantastic for covering a large space like a backyard or an open-concept living room. The trade-off? Objects will look smaller and you'll lose detail, especially far away.
On the flip side, a camera with a narrower FoV—say, 90 degrees—gives you a more "zoomed-in" perspective. This is exactly what you want for high-priority zones like your front door or the end of your driveway, where capturing faces or license plates is the whole point. You cover less ground, but the detail within that smaller frame is significantly better.
Then there's resolution, measured in megapixels (MP) or familiar terms like 1080p or 4K. This dictates the clarity of your video. While 1080p is a decent starting point, a 4K camera delivers four times the detail. That extra resolution is what lets you digitally zoom in on recorded footage to identify a person or read a license plate without the image dissolving into a pixelated mess.
Key Takeaway: A wide FoV is for coverage. High resolution is for identification. For capturing actionable evidence at key entry points, a high-resolution camera with a narrower FoV is your best bet.
Mastering Light with Night Vision and WDR
Security doesn't clock out when the sun goes down. Most modern cameras come equipped with infrared (IR) night vision, which uses light invisible to our eyes to paint a black-and-white picture in the dark. When you're comparing models, pay attention to the IR range. A 30-foot range is okay for a small porch, but you'll want 60 feet or more for a long driveway or big backyard.
An even better option is color night vision. This technology uses ultra-sensitive sensors, and sometimes a small visible spotlight, to record in full color in low-light conditions. This can be a game-changer for identifying the color of a car or a piece of clothing.
Another non-negotiable feature for tricky lighting is Wide Dynamic Range (WDR). Picture a camera on your covered porch looking out into a bright, sunny yard. Without WDR, the porch will be a dark shadow or the yard will be a washed-out white blob. WDR technology brilliantly balances these light extremes, giving you a clear, usable image in both the bright and shaded areas at the same time. It's a must-have for any camera facing an entrance or window.
Matching Camera Types to Home Locations
Different camera styles are purpose-built for different jobs, and picking the right one from the start makes placement far more effective. It's no surprise the North American smart home security camera market is valued at USD 3.78 billion in 2024 and growing—people are upgrading to smarter, more capable systems. This boom is fueled by cameras with advanced sensors, which makes strategic placement more critical than ever. If you're interested in the data, you can read the research on smart home security camera growth.
Not sure which camera style goes where? Here’s a quick breakdown to get you started.
Choosing the Right Camera for the Job
This table will help you match the most common camera types to the locations where they'll perform best.
Camera Type | Best Use Case (Location) | Core Advantage | Key Placement Tip |
|---|---|---|---|
Bullet Camera | Driveways, Side Yards, Building Perimeters | Highly visible deterrent, easy to aim. | Mount under an eave to protect the lens and point it along a wall to monitor a specific path. |
Dome Camera | Porches, Ceilings, Vandal-Prone Areas | Discreet and difficult to tamper with. | The tinted dome makes it hard for people to know where the lens is pointing, increasing deterrence. |
PTZ Camera | Large Yards, Pools, Monitoring Active Areas | Pan, Tilt, and Zoom capabilities for active tracking. | Best placed high up with an unobstructed view to take full advantage of its ability to follow motion across a wide area. |
By aligning the camera's technical specs and physical design with its intended spot, you’re building a security system that doesn't just record what happens—it actively helps protect your home.
Pro Placement Tips and Common Mistakes to Avoid
Once your cameras are up and running, the job isn’t quite finished. Fine-tuning your home surveillance camera placement is what really separates a decent system from a great one. It’s about more than just pointing a lens at your door; it's about weaving a smart, seamless security net that leaves no gaps for trouble to find.
Let's get into some of the techniques the pros use and, just as importantly, the common pitfalls I see homeowners fall into all the time.
Smart Strategies for Maximum Coverage
One of the most effective strategies I rely on is creating overlapping fields of view. It’s a simple concept: you position two cameras so that each one’s viewing area slightly covers the other’s.
Imagine one camera watching your back door and another aimed down a row of ground-floor windows. By making sure their views intersect, you completely erase the blind spot that could otherwise exist between them. This simple tactic makes it virtually impossible for someone to slip past undetected.
Another game-changer, particularly for inside your home, is corner mounting. When you place a wide-angle camera high up in the corner of a room, you get the most expansive view possible. From this single vantage point, you can often monitor a front door, a main hallway, and a staircase all at once. It’s simply the most efficient way to cover the most ground with the least amount of hardware.
Hiding Wires for Security and Style
An exposed wire isn't just an eyesore—it’s a flashing invitation for trouble. A smart intruder can snip a visible cable in seconds, completely disabling your camera. That’s why properly concealing your wires is a non-negotiable step, even for "wireless" cameras that still need a power cord.
Here are a few solid options for tucking those cables away:
Go Through the Walls: This is the gold standard for a clean, secure installation. It means drilling small holes and fishing the wire through the wall cavity to your power source or recorder. Yes, it's more work, but the result is a professional, tamper-proof finish.
Use Conduit: For outdoor runs along brick or siding, plastic or metal conduit is your best friend. It creates a protective channel for your wires, shielding them from both weather and would-be saboteurs.
Get Creative with Siding and Soffits: You can often hide wires by tucking them into the channel where your siding overlaps. Another great spot is along the underside of soffits and eaves, keeping them out of sight and out of mind.
Hiding your camera’s wiring isn’t just about making your home look tidy. It’s a fundamental security measure that prevents your system’s most obvious weak point from being exploited.
Top Placement Mistakes You Must Avoid
I've seen countless security systems rendered useless by simple, avoidable placement errors. Knowing what not to do is every bit as important as knowing what to do. Sidestepping these common traps is crucial for an effective setup.
Forgetting About Your Wi-Fi Signal For any wireless camera, the Wi-Fi signal is its lifeline. Placing a camera at the very edge of your network's reach is a recipe for failure. You'll get choppy video, frustrating connection drops, and missed recordings—precisely when you need them most. Before you permanently mount anything, walk over to the spot with your phone and run a Wi-Fi speed test. If the signal is weak, you either need to move the camera closer to the router or install a Wi-Fi extender.
Pointing Cameras Directly at the Sun This is a classic rookie mistake. Aiming a camera straight into the sun, a bright porch light, or even a highly reflective surface will create blinding glare and lens flare, completely washing out the picture. The footage becomes worthless. The fix? Always position the camera so the main light source is behind it or off to the side. If you're stuck with a challenging spot, investing in a camera with high-quality Wide Dynamic Range (WDR) is your only real solution.
Mounting Cameras Way Too High It’s tempting to mount cameras as high as possible, thinking it keeps them safe from tampering. While the intention is good, sticking a camera on a second-story eave often gives you a great view of the top of someone's head, and not much else. The footage is too far away to capture a clear face or any other useful identifying detail. Remember the sweet spot: 8 to 10 feet off the ground. It’s high enough to be out of easy reach but low enough to capture the details that matter.
Ignoring Your Neighbor's Privacy This one cannot be overstated. Your security system is there to protect your home, not to snoop on your neighbors. Never, ever point your cameras at their windows, into their backyard, or anywhere else they have a reasonable expectation of privacy. Beyond being a bad-neighbor move, it can land you in legal hot water. Thankfully, most modern cameras have a "privacy mask" feature that lets you digitally black out parts of the view. Use it to ensure you're only recording your own property.
Common Questions About Camera Placement
Even with the best plan in hand, you’re bound to run into specific questions when you start mounting cameras. I’ve seen it countless times. Getting these details right is what separates a truly effective home surveillance camera placement strategy from one that just gives a false sense of security.
Let's walk through some of the most frequent questions I get from homeowners. These aren't just minor details—they’re often the deciding factors between a system that works and one that just looks like it does.
How High Should I Mount My Outdoor Security Cameras?
The sweet spot I always recommend for outdoor cameras is 8 to 10 feet off the ground. There’s a good reason for this specific range; it’s all about striking a strategic balance.
Placing a camera this high keeps it out of easy reach for a would-be burglar trying to tamper with it. Go any lower, and you're just making it a target. But if you go too high, you risk only capturing the tops of heads, which is useless for identification. The 8-to-10-foot range gives you a commanding view of the area and a much better chance of capturing clear, identifiable facial details.
Is It Legal to Point a Camera at My Neighbor's Property?
This is a big one, and it's all about respecting privacy. While you absolutely have the right to monitor your own property, that right stops where your neighbor's reasonable expectation of privacy begins.
The rule of thumb is simple: always aim your cameras to cover your own property—your entrances, your yard, your driveway. Intentionally recording the inside of a neighbor's home or their private backyard spaces is a major overstep and often illegal. It’s just not worth the trouble.
A great pro-tip here: If your camera’s view can't avoid catching a small piece of their property, look for a "privacy mask" feature. Most modern cameras have this, and it lets you digitally black out specific zones in the camera’s view. It's the perfect way to respect privacy while keeping your home secure.
Do I Need Indoor Cameras If I Already Have Them Outside?
This really comes down to what you want your security system to accomplish. Outdoor cameras are fantastic deterrents; they're your first line of defense and can stop a break-in before it even starts.
Indoor cameras, on the other hand, play a different role. They are your star witnesses if someone does manage to get inside. Their job is to provide undeniable proof, capturing crystal-clear images for identification and documenting exactly what happened. Plus, many people find them useful for checking in on pets or kids when they're away.
Worried about privacy? You can easily manage it. Look for cameras with physical lens covers or use "home" and "away" modes that ensure they only record when the house is empty.
How Do I Prevent Glare From Ruining My Camera Footage?
Glare is the arch-nemesis of clear video footage. It can turn a crucial piece of evidence into a washed-out, useless clip. The best defense is smart placement. Never, ever point a camera directly at a strong light source, like the sun or an unshielded porch light.
Think of it this way: position the light source behind or to the side of the camera. This way, the light illuminates the scene you want to capture instead of blinding the lens.
For those tricky spots with mixed lighting—like a shaded entryway that opens onto a bright, sunny street—you’ll want to invest in a camera with Wide Dynamic Range (WDR). This technology is a game-changer. It digitally balances the light and dark parts of the image, allowing you to see details clearly in both the deep shadows and the bright spots at the same time.
At PCI Audio-Video Security Solutions, we understand that every property is unique. If you're looking for expert guidance to create a customized, professional-grade security plan for your home or business, our team is here to help. Explore our advanced camera systems and installation services at https://www.pciavss.com.
Comments