
Your Guide to Installing Security Cameras Outdoor
- Бонус за регистрацию онлайн казино
- Aug 25, 2025
- 14 min read
Before you even think about grabbing a drill, the most critical part of installing outdoor security cameras is creating a solid plan. A little forethought goes a long way in preventing frustrating blind spots, poor video quality, and a system that doesn't actually make you safer.
The secret to effective camera placement is to think like a burglar. Walk around your property and ask yourself: "If I wanted to break in, where would I go?" Your answers will highlight the exact spots you need to watch.
Your Blueprint for Effective Camera Placement
I've seen it time and again: a rushed installation almost always leads to disappointment. Getting this right is 90% planning and 10% execution. The goal isn't just to stick cameras on your house; it's to create overlapping fields of view that cover every potential weak point, leaving nowhere for an intruder to hide.
That initial walk-around is your most powerful tool. It's where you'll map out the entire system before spending a dime or drilling a single hole.
Identify Your Critical Surveillance Zones
While every home is different, there are a few key areas that are almost always high-priority. Your plan should focus on these first.
Front Door and Porch: This is your number one spot. You want a clear shot of the face of anyone who approaches your door, day or night.
Driveway and Garage: A camera here keeps an eye on your vehicles and anyone who pulls up. Mounting one on the corner of your garage often gives you a fantastic, wide-angle view.
Back and Side Doors: Don't forget these! Intruders love secondary entrances because they're often out of sight from the street. Patios, side gates, and basement doors are prime targets.
Ground-Floor Windows: Any window on the first floor is a potential entry point, especially those that are obscured by bushes or fences.
A common mistake I see is homeowners focusing only on the front of their property. Most break-ins happen at less visible spots, so covering all sides of your home is what provides real security.
Finding the Sweet Spot for Camera Height
Positioning is a balancing act. If you mount a camera too low, it’s an easy target for a vandal to disable or cover. Mount it too high, and all you'll capture is the top of people's heads, which isn't very useful for identification.
As a rule of thumb, aim for a height between 8 and 10 feet off the ground. This is high enough to be out of easy reach but still low enough to capture clear facial details. For instance, placing a camera 9 feet up on the corner of your house can perfectly cover your driveway and walkway, all while being tough to mess with without a ladder.
The demand for well-planned security is booming. The global outdoor security camera market is projected to reach about $5 billion by 2025, largely thanks to smarter AI features and a growing desire for reliable home protection. You can discover more about these market trends and how they're shaping modern security.
Gathering the Right Tools for the Job
Nothing tanks a weekend project faster than having to make multiple trips to the hardware store. Taking a few minutes to get all your gear together first will make the entire installation process a whole lot smoother. Trust me, it turns a potential headache into a job you can be proud of.
Of course, you’ll need the basics: a solid ladder, a power drill with a good set of bits, and a pencil for marking your spots. But for a truly secure and long-lasting outdoor setup, you'll need to dig a little deeper into the toolbox. What you need really depends on what the outside of your house is made of.
Specialized Gear for Your Home's Exterior
Trying to use a wood screw on a brick wall is a classic rookie mistake, and it just won’t hold. You have to match your tools to the surface.
For Brick or Stucco: Don't even try without a hammer drill and a good set of masonry drill bits. These are built to power through dense materials without causing cracks or damage.
For Vinyl Siding: A neat trick here is to use vinyl siding hooks. These little clips are brilliant—they slide right under the edge of a siding panel, giving you a solid mount without drilling any permanent holes.
For Wood or Fiber Cement: Good news! Your standard drill and a handful of quality, outdoor-rated screws are all you need here. Just make sure they're rated for exterior use so they don’t rust out in a year.
I can't tell you how many systems I've seen fail because of poorly protected connections. It's the #1 most overlooked step, and even a tiny bit of moisture will eventually lead to corrosion and a dead camera.
Essentials for Wiring and Weatherproofing
Getting the camera on the wall is only half the battle. Protecting your cables from the elements is just as crucial for a system that actually lasts.
If you’re installing a wired camera, your best bet is to run the cables through your walls or soffit for a clean, professional look. A tool called a fish tape is your best friend for this job; it helps you snake wires through those tight, hard-to-reach spaces with ease. For any PoE (Power over Ethernet) cameras, make sure you're using outdoor-rated Cat6 Ethernet cable. It has a tough, UV-resistant jacket designed to survive years of sun and storms.
Finally, a few items are absolutely non-negotiable for weatherproofing. An outdoor-rated junction box is the right way to house and protect your cable connections from rain, sleet, and snow. And for any hole you drill through an exterior wall, you must seal it. A tube of 100% silicone sealant will create a permanent, watertight barrier that locks out moisture and keeps pests from finding a new way into your home. A little extra effort here goes a long way.
How to Mount and Position Your Cameras
With your plan in hand and your tools laid out, it's time to get to work. This is the part where your blueprint becomes reality, and a little patience here goes a long way. Getting the physical installation right ensures your cameras are stable, secure, and aimed perfectly to catch what matters.
First things first, let's transfer those spots you marked on your plan to the actual walls. Grab the camera’s mounting bracket, hold it up to your chosen location, and use a pencil to mark where you'll need to drill. Before you make any holes, double-check the height. Remember, the sweet spot is between 8 and 10 feet off the ground—high enough to be out of easy reach, but low enough to capture clear facial details.
Take a look at how strategic placement creates a seamless web of security, leaving no place for intruders to hide.
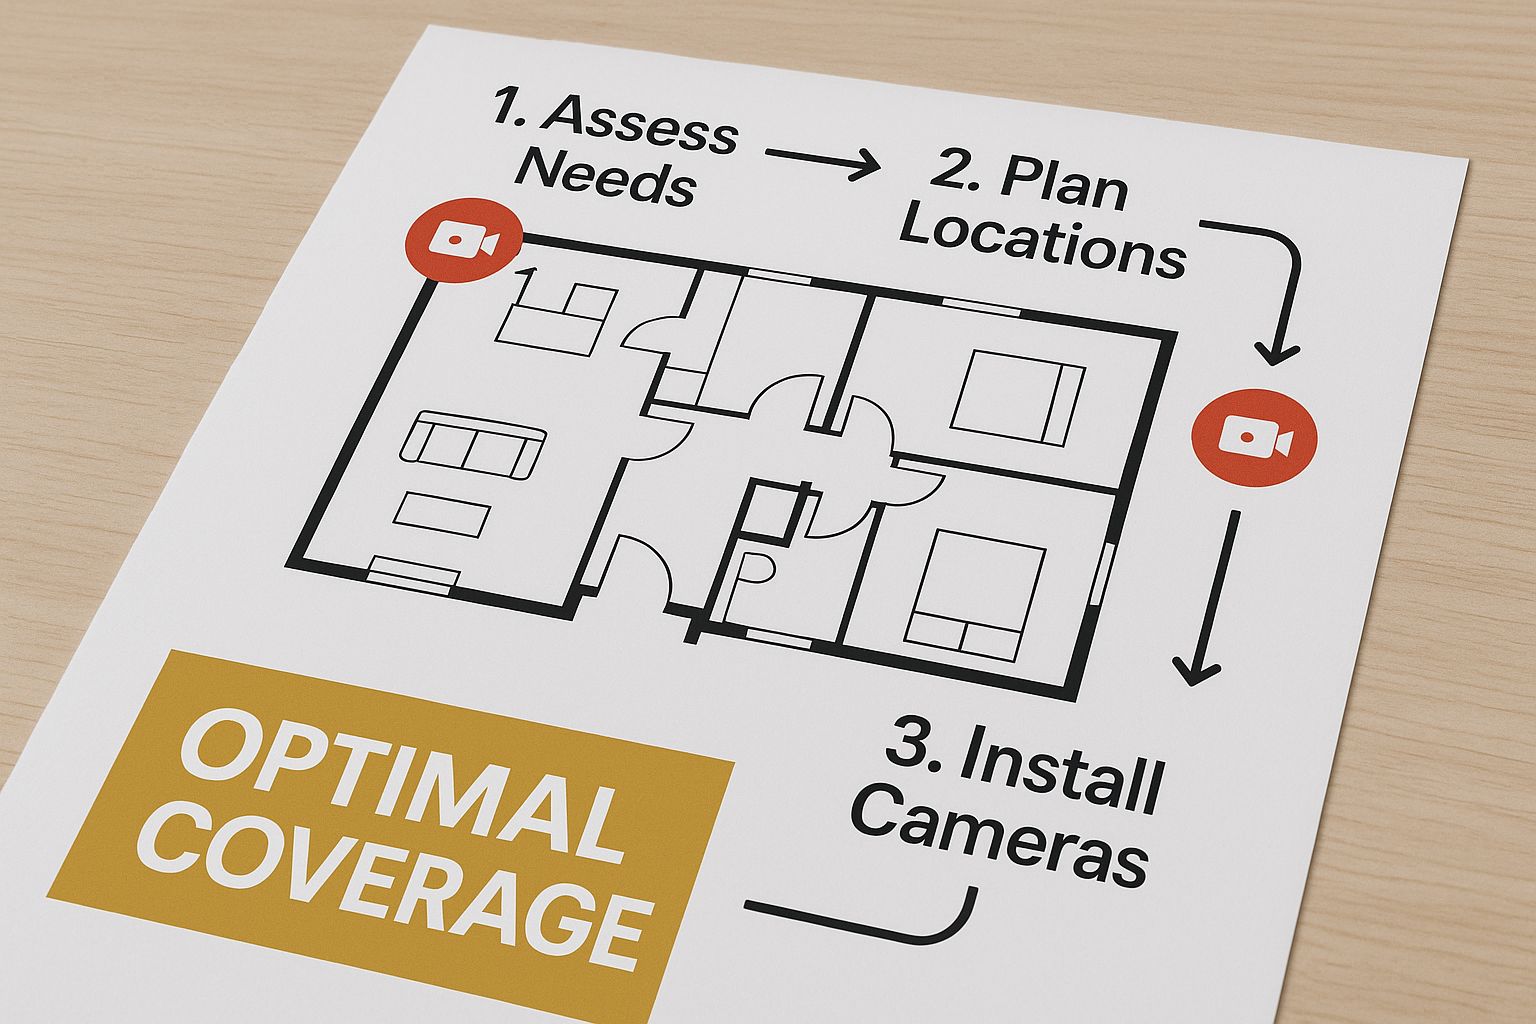
As you can see, overlapping the fields of view is the key. It’s a professional technique that ensures every critical angle is covered from multiple perspectives.
Securing the Mount to Different Surfaces
The type of wall you're mounting to completely changes the game. Using the wrong hardware is just asking for a camera to come crashing down during the first major storm. It's a common rookie mistake.
Wood or Siding: This is about as easy as it gets. Just drill some pilot holes on your pencil marks and drive in some quality outdoor-rated screws to fasten the mount.
Brick or Stucco: You'll need more muscle for this. A hammer drill fitted with a proper masonry bit is a must. After drilling your holes, tap in some plastic wall anchors, and then screw the mount into those for a hold that won't budge.
Soffits or Eaves: Mounting under the eaves is a great move for extra weather protection. You can drill directly into the wood, just make sure you’re positioning the camera so the view isn’t blocked by gutters or downspouts.
Honestly, the single biggest mistake I see people make is getting the angle wrong. A camera pointed too high just records clouds, and one aimed too low misses everything happening at the edges of your yard. Always, always check the live feed on your phone before you crank down those screws for the final time.
Fine-Tuning Your Camera’s View
Once the bracket is securely on the wall, attach the camera but leave the adjustment screws just loose enough so you can move it around. This is where you dial in the perfect shot.
Pull up the live feed on your security system's mobile app. Your goal is a slightly downward angle that covers the most important ground area, like your driveway or the path to your front door. Try to avoid pointing it directly where the sun will be, as the glare can completely wash out your footage and render it useless.
When you've got the view just right, go ahead and tighten all the adjustment screws. Don't be shy—make them snug so the camera won't get knocked out of position.
The final, crucial step is weatherproofing. After you’ve run your cables through the wall, grab a tube of 100% silicone sealant. Apply a clean bead around the base of the mount and over any holes you drilled for wiring. This creates a watertight barrier that stops moisture from creeping into your walls and protects your connections from the elements. It’s a simple detail that makes a huge difference in the long-term reliability of your setup.
Managing Wires for a Clean and Secure Installation
Exposed wires are more than just an eyesore; they're a massive vulnerability. Let’s be honest, dangling cables are a welcome mat for any intruder with a pair of wire cutters. They’re also an open target for weather, UV rays, and even curious squirrels. When you're installing an outdoor security camera, the goal is simple: make the wiring disappear.

Even many "wireless" cameras still need a power cord, so you can't just skip this step. A clean, professional-looking job means every wire is neatly tucked away, shielded from the elements, and completely out of sight.
Concealing and Protecting Your Cables
The gold standard for hiding wires is to run them straight through your home’s structure. I always try to route cables through an attic, basement, or crawl space first. From there, you can often drill a small, discreet hole out through the soffit—the underside of your roof’s eaves. This keeps the wire completely protected and invisible from the outside.
But what if that’s not an option? You still have solid choices:
Conduit: Grab some thin PVC conduit from the hardware store. It’s perfect for running along siding or trim, and you can paint it to match your house, making it blend in surprisingly well.
Cable Clips: For short, straight runs, a few outdoor-rated cable clips can work wonders. Use them to tack the wire tightly along a corner or under a deck railing where it won't be noticed.
For more complex wired systems, especially on larger properties where you might need to cross a yard, proper underground electrical conduit installation is the only way to go. It’s the ultimate in protection and safety.
A Pro Tip I Can't Stress Enough: The second you drill a hole through an exterior wall, you’ve created a tiny doorway for water and pests. Never leave this hole unsealed. A quick bead of 100% silicone sealant is non-negotiable. It takes 30 seconds and protects your home’s integrity.
The Global Surge in Surveillance
Taking the time to do this right puts you in good company. The global CCTV and surveillance industry is on track to explode to over $234 billion by 2034. This boom isn't just about big corporate security; it’s driven by a massive increase in awareness among homeowners and small businesses who see the value in effective surveillance.
This incredible growth just underscores why a secure, tamper-proof installation is so important. By properly concealing your wires, you're making sure your system is a reliable part of that security network, not its weakest link.
Bringing Your System Online and Dialing It In
The hard part is over—your cameras are up, and the wires are tucked away. Now for the fun part: bringing your new security system to life. This is where you transform a collection of hardware into an intelligent, responsive tool that actually works for you.
First, you'll need to get everything talking to your network. If you went with a wired Power over Ethernet (PoE) system, this just means plugging your cameras into your Network Video Recorder (NVR). For Wi-Fi cameras, you’ll use the manufacturer's app on your phone. It usually walks you right through the process—often by having you scan a QR code on the camera and enter your Wi-Fi password.
Taming Motion Detection Alerts
Right out of the box, most security cameras are extremely sensitive. A spider building a web in front of the lens or a car's headlights sweeping across your lawn at night can trigger an alert. If you don't tweak these settings, you'll get so many false alarms that you'll start ignoring them completely, which defeats the whole purpose.
Your first move should be to adjust the motion detection sensitivity. I like to think of it as a volume dial. You want to turn it down enough to filter out the small, insignificant movements but keep it high enough to catch what matters, like a person walking up to your door. Most apps have a simple slider for this. It’ll take a little experimenting to get it just right, but it's worth the effort.
A well-tuned system should alert you when a package is dropped off, not every time a squirrel runs up a tree. This is the difference between a security camera being a powerful tool versus a noisy annoyance.
Setting Up Smart Motion Zones
This is probably one of the most powerful features you can configure. Motion zones let you draw virtual boxes around specific areas in the camera's view that you want to monitor, while telling it to ignore everything else.
For instance, you can draw a zone that covers only your front porch and the path leading up to it. This simple trick will stop you from getting an alert every time a car drives down the street or someone walks their dog on the sidewalk. It’s a game-changer for reducing notification fatigue.
Here are a few ways I've seen people use motion zones effectively:
Driveway Cam: Draw a tight perimeter around your parked car to know if anyone gets too close.
Backyard Cam: Outline the patio doors and windows, but exclude the swaying trees or the neighbor's fence.
Side Gate Cam: A narrow zone right over the gate latch will alert you the moment it's opened.
The move toward IP cameras packed with these kinds of smart features is a big reason why the video surveillance market is projected to reach $44 billion by 2025. This level of customization gives you incredible control. You can discover more insights about IP camera statistics on scoop.market.us.
Finally, take a look at notification schedules. Do you really need an alert when your kids are playing in the backyard on a Sunday afternoon? Probably not. But you definitely want one if motion is detected there at 3 AM. Most apps let you set a schedule, so you only get pinged when it's most important. Spending 20 minutes dialing in these settings will give you true peace of mind, without all the constant digital noise.
Time to Put Your Work to the Test
Alright, the cameras are up and the software is configured. It's tempting to call it a day, but we're not quite done. The most critical step is putting your new system through its paces to see how it handles the real world.
Think of it this way: you wouldn't trust a new car without a test drive. Spending just 30 minutes on a few key checks now will save you a world of frustration later and give you genuine peace of mind that everything works when it actually matters.
The All-Important "Walk Test"
This is the single best way to validate your camera placement and settings. Grab a family member or a friend and have them walk the perimeter of your property, moving through each camera’s designated coverage area.
While they do this, you'll be watching the live feed from your phone or monitor. Keep an eye out for a few specific things:
Unexpected blind spots: Did they disappear behind a column, a thick bush, or the corner of the garage for longer than you expected? These are the gaps you need to fix.
Motion detection accuracy: Is the camera triggering an alert or recording every time your helper enters a motion zone? You want it to be reliable, not sporadic.
Real-world image clarity: Is the picture sharp enough to actually identify a face from 20-30 feet away? Can you make out the numbers on a license plate in your driveway?
Don't Forget the Night Test
Now, do it all over again after the sun goes down. This is where many budget cameras fall flat. A system that looks great in broad daylight can become a blurry, useless mess in the dark.
Check that the infrared (IR) LEDs are lighting up the scene effectively. You're looking for a clear, evenly lit picture, not a washed-out "hot spot" in the center that makes everything else disappear into blackness. If you see harsh glare bouncing off a nearby wall or soffit, you may need to tweak the camera angle slightly.
A live feed doesn't tell the whole story. I once helped a friend troubleshoot a system where the Wi-Fi was just strong enough for a live view but too weak to reliably upload recordings. He had a great view of what was happening right now, but zero evidence of what happened an hour ago. Testing is everything.
Finally, run a full system check from end to end. Trigger a motion event, make sure the alert hits your phone within a few seconds, and then verify that the recorded clip was actually saved. Whether it's to your NVR, an SD card, or the cloud, confirm the footage is there and playable. Once you’ve done that, you know every link in the chain is solid.
Common Questions About Outdoor Camera Installation
No matter how well you plan, you're bound to run into a few questions once you start mounting your cameras. I've been there. Getting the right answers beforehand can be the difference between a secure, effective system and one that causes headaches down the road.
Let's walk through some of the most common things people ask.
Installation and Technical Hurdles
One of the first hurdles is often the physical installation itself. People constantly ask, "Can I actually drill into my brick or siding?" The answer is a definite yes, but you have to do it right. For brick or stucco, you absolutely need a hammer drill and the correct masonry bits. Trying to use a standard drill will get you nowhere fast. With vinyl siding, you can often use special siding clips to avoid drilling altogether, which is a fantastic way to prevent permanent holes.
Then there's the big question for wireless cameras: Wi-Fi. It's a valid concern. Will the signal really be strong enough at the edge of your property? The only way to know for sure is to test it before you drill any holes. Take your camera and phone to the exact spot you plan to mount it and check the live feed. If it's choppy or keeps dropping, a simple Wi-Fi range extender is usually all you need to bridge the gap.
Legal and Safety Considerations
This is where things can get tricky. "Am I allowed to record my neighbor's yard?" is a question I hear all the time. The laws change depending on where you live, but here’s a solid rule of thumb: keep your cameras focused strictly on your own property.
I can't tell you how many disputes I've seen arise from a poorly aimed camera. Pointing a camera directly into a neighbor's window or backyard sitting area is a surefire way to cause problems. Respecting privacy by sticking to your property lines is always the best policy.
Safety during the installation is another critical piece of the puzzle. Working on ladders and with power tools always carries some risk. If you're tackling a larger, more involved project, it never hurts to brush up on established safety protocols. Resources covering topics like UK workplace safety compliance can offer some really valuable best practices, even for a home DIY job.
Finally, the classic question: "Should I just hire a pro?" If you're comfortable on a ladder and know your way around a drill, installing one or two wireless cameras is a totally manageable weekend project. But if you're looking at a complex, multi-camera wired system, calling in a professional can save you a world of frustration and ensure it's done right from the start.
Frequently Asked Questions
To wrap things up, here are some quick answers to the most common questions that pop up during an outdoor camera installation.
Question | Answer |
|---|---|
Do I need an electrician for a wired camera? | Not always. Many PoE (Power over Ethernet) systems are low-voltage and can be safely installed by a handy DIYer. However, if you need to run new 120V outlets, you should absolutely hire a licensed electrician. |
How high should I mount my cameras? | A height of 8 to 10 feet is ideal. This is high enough to be out of easy reach for tampering but low enough to capture clear details of faces and license plates. |
Are battery-powered cameras a good option? | They offer the easiest installation, but you'll need to recharge or replace the batteries periodically (every few months, typically). They are best for lower-traffic areas to conserve battery life. |
What's the best way to weatherproof cable connections? | Use a weatherproof junction box. Tucking the connections inside one of these small enclosures provides the best protection against rain, snow, and moisture damage. |
Hopefully, these answers clear up some of the common uncertainties and help you feel more confident about your installation.
For a professional, stress-free installation that guarantees optimal coverage and reliability, trust the experts at PCI Audio-Video Security Solutions. Contact us today for a consultation at https://www.pciavss.com.
Comments